Pages

Excel Ribbon Introduction 1

Introduction

I have been reading and practicing different skills about Microsoft tools like Office and Excel. As it happens to me that I very easily forget things when I leave them(except some), So what am I going to do is document it in my blog as Word and Excel Tutorial Series so that I could refer to it later. In the mean time, other viewers could also benefit from it. So lets get going.Smile

Excel Ribbon

Microsoft Excel 2007 has eight standard ribbon tabs. There are other additional tabs as well which could be added to the ribbon. There is also a contextual tab which appears when a particular element is selected. For example when a picture is selected in excel, a new tab appear under which are different commands that could be performed to a picture.
image
The ribbon has mainly three parts.
  1. Tabs
  2. Groups
  3. Commands
The tabs are the highest element of the hierarchy. Each tab contains different groups and under each group contains similar kind of commands that could be performed to an element.

Home

The home tab the most general tab. Inside it contains different options like the font size, color, copy-paste utilities, text align commands, text wrap and cells merge-format commands. There are also conditional formatting utilities from where you could add rules like what will be the background of a cell depending on their values etc.

Insert

I guess this is the second most used tab. It contains options like creating a table, pivoting the table elements to analyze data, insert pictures, draw pie charts and bar diagrams, Symbols, etc.
image

Page Layout

This should be one of the most used tab. I contains commands for setting the design of the page. For example, its layout, margins, width-height, backgrounds etc.
image

Formulas

As you know that excel is mostly used to perform certain mathematical formulas and analysis on a table of data, the formulas tab is relevant for excel. Most of the groups in this tab contains commands related to some type of formulas to be performed in the data.
image

Database Test with JMeter


Overview

In my previous post, I have described the basic idea of getting started with JMeter. I am going to give continuation to the same Tool with a Database test design. For better understanding of this post, You might have to take a look at that one.

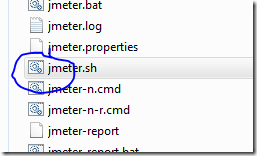
1. click on the bat file

Go to the bin folder of JMeter and start the Jmeter window.
image

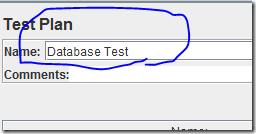
2. Rename the Test Plan to Database Test

When the JMeter window starts, you are ready to develop the test. Start this process by Renaming the Test-plan to Database Test. This name is relevant to the test we are actually developing.
image

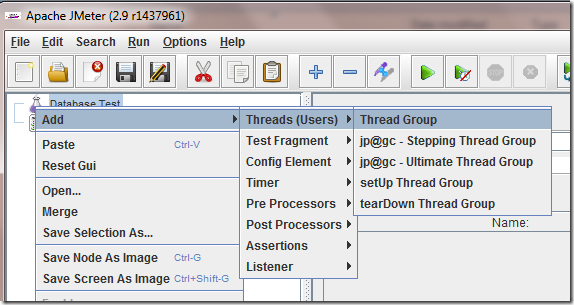
3. Add the Thread groups

As always, add the Thread-Group under the Database Test. Configure the timings and the number of users as described in my previous post.
image

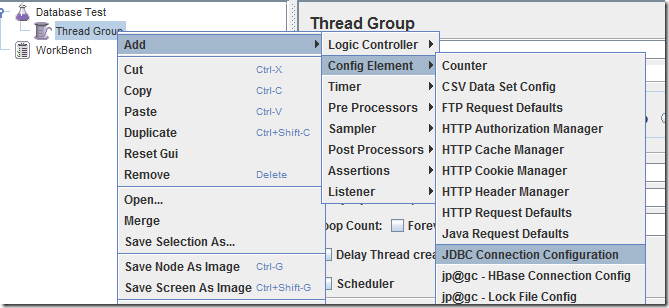
4. Add the JDBC Connection Configuration

Not the actual database work begins. Add the JDBC Configuration element inside the Thread-Group. This is the element where you configure your database-server’s location and provide an access variable to this server. You could have several database configurations defined in single test plan, and choose between which one to use from the variable name you defined in those configurations.
image

5. Enter the configuration information

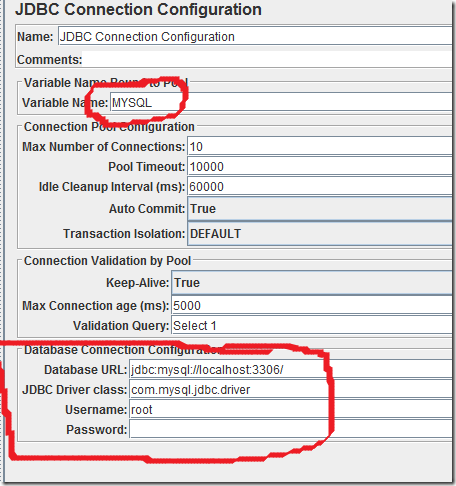
Enter the database configuration information.You can see the Database-URL, and the JDBC driver class etc. The database connector jar for that database should be in the class path of JMeter before running this test. You could do this by putting the jar in  the lib/ or lib/ext/ folder of the JMeter and then restart the JMeter. The top most variable name field is where you provide a reference name for this configuration. Later you will use this same name to access this database.
image

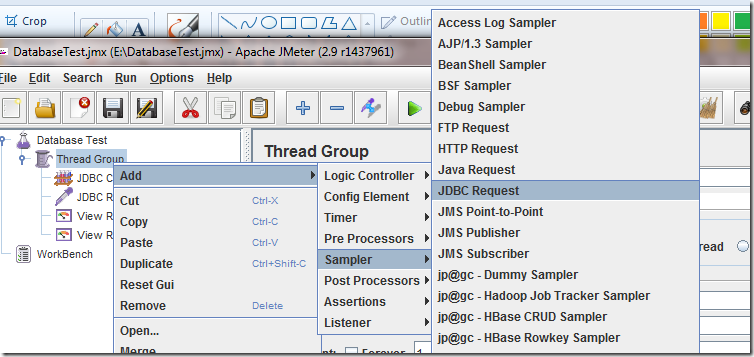
6. Add Database Request Sampler

Database Request sampler is where you actually write the query to be fired and the database configuration to be used.
image

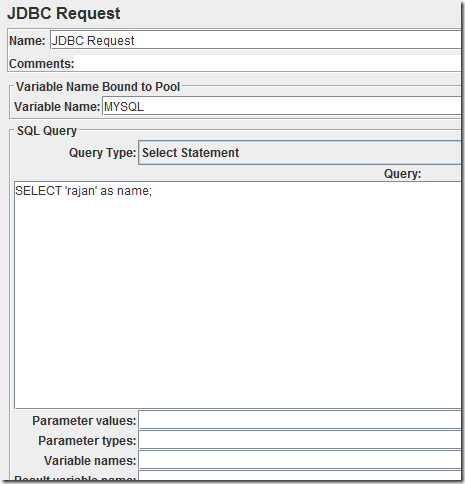
7. Add the queries and connection information

image

8. Add the appropriate listeners

This part is exactly same as my previous post.

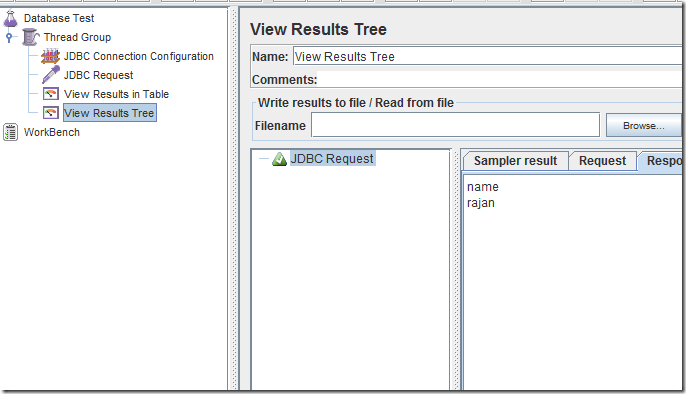
9. Run

image

Summary

This example is not much, but it provide the fundamental ideas to use JMeter for database testing. You could start with this simple example and then start exploring and digging deep into the fun of JMeter. You could compare two database, simulate multiple users vs response time rise, create a graph etc.

User creation Oracle

Background

I was involved in transfer from one machine to another in oracle. Initially I have never done this kind of data transfer kind of things. I searched for this one on the google, and It started showing lots of different example and stuffs where we have to unlock the SCOTT user which is also a default user in oracle as system and sys, grant privileges to it etc. In my case, those things may already have been taken care of.

There are mainly two paths you could follow to replicate the same schema to another.
  • Transfer through file dump
  • Transfer through SQL/PL-SQL using dblinks
Now there are some advantages and disadvantages of those two methods.
  • The PL-SQL methods is easier for the implementation as it is quiet straight forward, but not everything is transferred by this method. You may transfer the tables, stored procedures, but there are many objects in the schema and it is hard to transfer all of them. For example: It is most unlikely that you will replicate the users with same usernames and passwords, and you may skip the privileges that they were granted in the source schema.
  • The file dump method is slight tedious. You have to first create a dump file for the schema. The size of the dump may be much larger than the current size of the schema itself because the history data are also stored in the schema unless you forced it to re-size it. You may use the compress all option to create the compressed version of the dump. You then transfer it to the target machine through FTPor SCP or others. Then you have to import the file to the database. Its main advantage is that everything in the schema is transferred. The users, privileges, and everything else.

Create a dump of the schema that you want to transfer(server1)

expdp <schemauser>/<password> schemas=<schemaname> dumpfile=<dump>.dmp DIRECTORY=<DUMP_DIR>
Note:
  • expdp is a os level command for oracle that gets installed on the user or group where oracle is installed.
  • The DIRECTORY object should already have been created in oracle pointing to a location, and the dump file will be created in the location.(Create or replace directory <Directory_name> as '/orcl/data/dumps')

Transfer the dump to server2(server1)

Now we need to transfer the dump created above to server2 where we could actually import it.
This could be done by scp or ftp commands. I am going to use the scp command.
scp <src> <dst>
scp abc.txt user@<host>:/location/of/remote/directory
scp user@<host>:/location/of/remote/file  /path/to/local/directory

Import the dump file to a schema(server2)

To import the dump file just transferred to server2, we could use the following command.
impdp <username>/<password> schema=<schema_name> dumpfile=<filename>.dmp DIRECTORY=<DUMP_DIRECTORY>  
NOTE:

  • The schema <schema_name> on which we are trying to import the dump, should already be created.
  • if the schema names etc were different then the source schema names, remap commands should be used.
  • The schema/user should have appropriate privileges.

Create an schema passing the location where to store the .dbf file(server2)

The dbf file is where the actual informations and metadata regarding the schema are stored. First login to the server using putty(SSH) and hit the following command on the terminal.

CREATE bigfile tablespace tablespacename
 datafile '/orcl/data1/oradata/orcl/tablespacename.dbf'
 size 100M
 autoextend ON NEXT 100M maxsize unlimited
 SEGMENT SPACE MANAGEMENT AUTO
 NOLOGGING;

Create a user, with that tablespace name as the default tablespace(server2)

CREATE USER username IDENTIFIED BY oracle DEFAULT TABLESPACE tablespacename

Grant create session to the user(server2)

GRANT create session TO username;

Now you may also need knowledge about the deletion of users in case your first try did not go so well as mine. Well here's how you do it.

How to drop a user including everything of the user(server2)

 DROP USER XXXXXXXX cascade;

The cascade word will delete everything related to the user including its privileges etc.

Drop the tablespace all everything of it(server2)

DROP TABLESPACE XXXXXXXXXXX INCLUDING CONTENTS AND DATAFILES CASCADE CONSTRAINTS

Getting started with Maven

Overview

I still remember my initial college projects where we use to develop various components using various sets of API’s. We used to face compile problem transferring the project from one members machine to another’s machine mostly because the libraries were stored in a location in the main developer’s machine. And when it was transferred to another’s machine, the APIs were not in the same location. The jars were directly included in the build path or sometimes jars were included in a library and the libraries were included in the build path of the project. We also found a general method where, we made a Lib folder inside the project itself and put all our jars into that folder. Now all we have to do while transferring our project from one machine to another machine was to transfer the root folder completely, and include the /Lib folder in the build path of the project. There were other problems however. We have heard about version control systems, and we were using it to store our project safe in the remote location. We have to upload all the library files (jars) to the Git. Certainly not a good idea. The source files were few MB where as the jars could be hundreds of MBs. There is however an easy solution to the problem of which we were unaware  then. The name of the solution is called maven. I have tried it only for Java so I don’t know whether it is or some similar tools is available for other language.  

Introduction

Maven is a command line tool mainly. You go to a location here. Extract it in some location in your computer. Add the location of the bin file in the path of the operating system. Now open a command-prompt and type mvn and click Enter. If it displays some information about maven, congratulations, Maven is installed.  

Creating Maven Project with eclipse

As per the concept of learning by example, let's create a maven project from eclipse and see our first experience with maven. Lets create a java application that requires “Selenium” API. A little thing about this API is that it is a web Driver which can simulate users action of browsing the web browser(hovering, clicking, scrolling, downloading etc.). Lets create a normal Java project with eclipse. clip_image002
 Now , right click on the project folder in the left Project-Explorer panel and then click configure->”Convert to maven Project”. clip_image004
 A configuration window will appear where you have to provide a couple of information. Some of them are group Id, Artifact Id, Version, Packaging, Name, Description etc. These are the minimum things you have to do as shown in the picture. clip_image006
 The group Id, artifactId are rather kind of a signature for the project. You can guess what others are for. Clicking on the finish button will create a pom.xml( Project Object Model) file. clip_image008 This is a general pom for the whole project and not related to just selenium only. Selenium will be just a dependency for the project. To add the dependency , Right click on the pom file and then click Maven->”Add Dependency”. clip_image010 A window will appear. Type “selenium” on the search box. clip_image012
 Select the seleniumhq as selected and click ok. It will add a dependencies tag in the pom. Now create a class as the example below.
Note: For the eclipse to find the search term(eg. selenium here), the maven repository index should have been created. If its not created, Goto Window->ShowView->Maven Repositories and click it. When it appears, expand the central Repository, right click and then finally Create Index. You should have active internet connection, and it could take some time.

import java.util.concurrent.TimeUnit; 

import org.openqa.selenium.By; 

import org.openqa.selenium.WebDriver; 

import org.openqa.selenium.WebElement; 

import org.openqa.selenium.chrome.ChromeDriver; 

import org.openqa.selenium.firefox.FirefoxDriver; 

import org.openqa.selenium.ie.InternetExplorerDriver; 

import org.openqa.selenium.remote.DesiredCapabilities; 

public class GoogleTest { 

public WebDriver driver; 

public String testUrl = "http://www.google.com"; 

public GoogleTest() { 

initiateFirefoxDriver(); 

//driver = initiateIEDriver(); 

//driver = new ChromeDriver(); 

} 

public void initiateFirefoxDriver() { 

driver = new FirefoxDriver(); 

driver.manage().timeouts().implicitlyWait(30, TimeUnit.SECONDS); 

} 

public WebDriver initiateIEDriver() {// 

DesiredCapabilities capabilities = DesiredCapabilities.internetExplorer(); 

capabilities.setCapability(InternetExplorerDriver.INTRODUCE_FLAKINESS_BY_IGNORING_SECURITY_DOMAINS, true); 

WebDriver driver = new InternetExplorerDriver(capabilities); 

return (InternetExplorerDriver)driver; 

} 

public void test1() { 

driver.get(testUrl); 

WebElement searchBox = driver.findElement(By.name("q")); 

searchBox.sendKeys("selenium"); 

driver.findElement(By.id("gbqfba")).click(); 

} 

public static void main(String[] args) { 

GoogleTest gt = new GoogleTest(); 

gt.test1(); 

} 

}
Now you are ready to run the class file. Run it and you will see the result.  

Summary

Notice that you have not downloaded any of your library files (jars) and added them in the build path of the project. Rather you added the dependencies in the pom, and the maven, which is the most popular build tool for java applications, will automatically add the dependent libraries into your projects. This method is very useful in the industrial environment as it is totally tiresome to build the dependency manually, and then compile it etc. I will talk about the deployment automation in my next document. Till then happy coding and happy mavenization.

Getting Started with JMeter

The Apache JMeter™ desktop application is open source software, a 100% pure Java application designed to load test functional behavior and measure performance. It was originally designed for testing Web Applications but has since expanded to other test functions.
Apache JMeter may be used to test performance both on static and dynamic resources (files, Servlets, Perl scripts, Java Objects, Data Bases and Queries, FTP Servers and more). It can be used to simulate a heavy load on a server, network or object to test its strength or to analyze overall performance under different load types. You can use it to make a graphical analysis of performance or to test your server/script/object behavior under heavy concurrent load.

Getting started

Download the JMeter binary from here (tgz, zip). Extract the file. You do not need to install jmeter on your computer. Go to the bin folder and run the jmeter.bat if you are in windows or jmeter.sh if you are in linux. After sometime you should see a window like this.

This is the dashboard of JMeter. You do not need to write any codes in jmeter. You just have to add the necessary readymade components in the UI, and then configure them to the particular thing you are trying to test. However, JMeter will generate a *.jmx file which contains necessary informations to start the same set test-plan the next time and you do not have to go through all the steps of arranging the component and configuring them everytime. You can just drag and drop the .jmx file to jmeter window to load the test. You are ready to create your first test plan using JMeter.

Preparing the TestPlan

Lets simulate a condition such that ten users are using google continuously each user clicking some request20 times and then see the performance of www.google.com  .
1.     First of all right click on the test plan and add a ThreadUsers->ThreadGroup.


This will add a component called ThreadGroup as a child component of the TestPlan. When you click on the component, its corresponding panel will appear on the right where you can control various things including its name that appears on the left component tree as well as on the final result.


Enter the values like this. This shows that there are 10 users and they will request 20 times each. So the total number of page requests will be 200. The ramp-up period is the gap of time in which the total request will be made.
2.     The second step is to add sampler(http-Request). The sampler is a component which makes a request to the server of component which you are trying to test. There are various kind of samplers (Ftp, Java, soap etc).
Right click the ThreadGroup and add Samplers->HttpRequestSamplers.


Enter “google.com” in the ServerName or IP text Box.


3.     This is the time to add some listeners.  A listener is a component which records the request and response data and lets the user see the actual data. Different listeners listens to the same data and provides different views of the result. Some focus on time taken, latency, while some shows graph. The “View results Tree” listener which we are using here will visualize the results sequentially with option to see the request data made and response data received. The “Summary Report” listener will show the metrices of the data and the times taken.
Right click the Thread-Group and add Listeners->ViewResultsTree, and Listeners->SummaryReport.


Execution

This is the time you run the test. Save the file with suitable name say “GoogleTest”. Then click the green triangle at the ribbon. 


The test will execute and you will be able to view the request and results in the “View results tree” sampler.


Summary

Thus you have successfully prepared a JMeter script to browse the web for the google with multiple users simultaneously make multiple requests. These kind of tests are very necessary for the production environment to verify that the server could handle expected number of requests per seconds.
This article covers very less features of the JMeter. But as the getting started concepts are much important, this is a good start. You could now yourself explore other features of JMeter. If I get any concern or query or feedback, I will post some other good practices and common issues in testing and how to solve it. :) Happy testing.